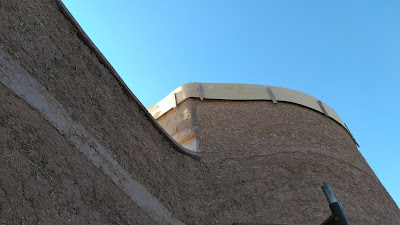
A parapet wall is a short stem-wall that rises above the roof line. In the case of this structure, the parapet wall is essentially a continuation of the exterior cob walls that surround the large room roof. The top-cap serves both a practical and an architectural purpose. The practical aspect of the cap protects the cob wall from the elements; and the architectural purpose provides for a uniform visual aesthetic with the two other roof lines that make up the structure.
The photo below shows the finished top-cap for the large-room roof. A lower roof also with a top-cap can be seen in the bottom-left of the photo.
CLICK ON ANY IMAGE TO ENLARGE
So how was this top-cap fabricated? The photograph below shows a top-down view of the forms used that would serve the purpose of retaining the poured concrete that is the material used for the top-cap.
In the center is the cob mix (clay & straw). 3/8" of structural rebar can be seen and runs the length of the stem wall. On each side of the cob stem-wall are 1-inch thick strips of hard foam at wall height that act to add additional width to the poured concrete, so that when the forms are removed, the top-cap will extend beyond each side of the wall to create a 'lip' over the wall to allow water to drip off the cap away from the wall.
The actual form to hold the poured concrete can be seen in the photo below. Due to the curves that make wall, a flexible form material was employed. In this case I used thin veneer plywood, cut 1-ft strips from an 4-ft by 8-ft sheet. I used 4-in deck screws through wooden stakes into the cob to hold the plywood form in place. The top-cap formt is roughly 3 to 4-in height (top-cap thickness) and about 8 to 12-in width (cob stem-wall width including the 1-in foam spacers on each side of the wall.
The two photos below show the extent of 'forming' for the top-cap around the curved wall that surround the large-room roof. The thin veneer is perfect for hugging the curves.

Also seen in the photo below is the existing top-cap of a lower roof.
The concrete was mixed in a mixer and hauled-up the scaffolding in 5-gallon buckets. Each bucket only 1/3 full due to the weight, then poured into the form, worked and flattened using a gauging trowel and rectangular metal float trowel.
The final result (below) is a protective top cap and uniform architectural styling.
I realized after cleaning-up the job-site and admiring the handiwork, that after 15-years the principal construction of the cob studio is now complete. There is still exterior plastering, interior wall rendering, windows/doors to install and floors to install. But that is the finishing work: The structure itself is finished!


1 comment:
Incredible work! I've been keeping up with your blog for the past year or so since discovering it. I'm glad to see that you've reached this juncture- congratulations!
Do you have any recent photos of the interior? I'd love to see the sort of light that you're getting in there; I'm sure the low, autumnal sun makes for a splendid atmosphere inside.
I'm about to embark on building a small, adobe workshop in my back yard in Phoenix and having read about your deliberations and frustrations has given me not only a realistic picture of what I may be getting into, but also a greater sense of confidence in being able to overcome the inevitable obstacles that I'll encounter.
Again- my heartiest congratulations! Well done!
Post a Comment