The final roof material needed to provide pitch (for drainage) and insulative properties was a decision between a spray 'foamed'-in roof; or some type of lightweight concrete. The easy way would have just been to hire a spray-foam roof contractor, but that would not have been keeping with my commitment to innovate with materials and to build the structure myself.
So I formulated a very lightweight concrete solution using simply Portland Cement, Vermiculite and some sand. Vermiculite clays are weathered micas in which the potassium ions between the molecular sheets are replaced by magnesium and iron. Vermiculite is a mineral that when heated commercially expands to create a porous featherweight material suitable for many applications.
(Below) Mixed in a cement mixer the ingredients were: water, Vermiculite, sand and Portland Cement. I do not have a recipe to share simply, there was none. Because Vermiculite absorbed much water, I kept adding water until I felt the consistency was right for application.
But roughly one mixer load consisted of 5-gallons water, 4-cuft bag of Vermiculite, 3-shovels Portland Cement an 20-lbs of Sakrete Topping mix (Sand/Portland Cement). That mix yielded five 5-gallon buckets 3/4-full each.
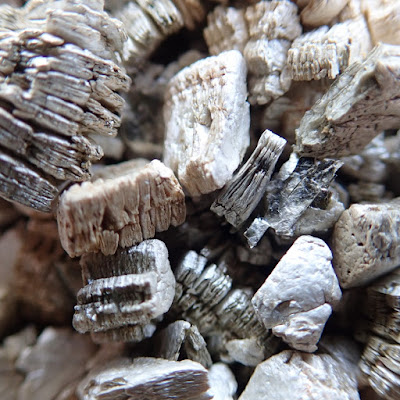
Magnified Vermiculite. Has the look and texture of those small foam peanuts used for packing material.
Photo below shows relative size. One thing I would do differently is purchase the 'fine' size/grade of
Vermiculite. I purchased the 'course' grade and it was harder to trowel
because of it's size and coarseness. There is a 'fine' grade of
Vermiculite that would be more suitable for trowel workability.
This job required 25-bags of Vermiculite that I purchased from BASCO, Inc.to cover 300-sqft of roof area averaging about 3" in height. A 4-cuft bag of Vermiculite runs about $30.
The photograph below shows several string-lines I set-up along with a line-level to ensure the North-to-South pitch of the finished concrete roof will drain out the south-wall roof drain. The height of the concrete mix at the north end was approximately 4-inches, gradually sloping-down to 1.5-inches at the South wall where the scupper drain is located.
More on Vermiculite at Wikipedia. Below is a mention
"Roof and floor screeds and insulating concretes: exfoliated vermiculite (typically the finer grades) can be added at site to Portland cement and other aggregates, rheological aids, and water to produce roof and floor concrete screeds which are lightweight and insulating. In many cases, vermiculite-based roof screeds are used in conjunction with other insulation materials, such as polystyrene board, to form a total roofing system. A bituminous binder can also be used with exfoliated vermiculite to produce a dry, lightweight roof screed which has the advantages of low thermal conductivity, low moisture content, and ease of placement (by pouring from the bag and then tamping)."
More blog posts on the roof will follow...It's not completely finished yet!


2 comments:
Hmmmm. I expect it will take a while for the water to evaporate from the vermiculite. Do you think you will experience any shrinking? Also would it be a good idea to wait until it's fully cured before adding the roof waterproofing coat?
Andy. Thanks for your comment. The roof 'cured' for a week in this dry June heat. I didn't notice any cracking or shrinking prior to the rubberized coating. I also added a few shovels of sand in each mix in order to aid some strength and reduce the potential to crack. The only change I would make would be to get a small-size of Vermiculite, primarily for work-ability with a trowel.
Post a Comment